On 12/05/2019, the club organised a multipitch abseiling trip to Malaita Point, a well-known and very popular beginner multipitch abseil. Oz Ultimate describes it as “a reasonably straightforward abseil trip. There is minimal exposed scrambling, and the abseils are not particularly hard. It is a good multi-pitch trip for people who have already done single pitch abseiling”.
The group was formed by 7 people, including 3 leaders. Everyone had abseiled before and/or had done a few vertical canyons with the club. However, as the leaders could identify during the trip, their abseiling skills needed improvement, and they hadn’t been given enough information regarding safe abseiling techniques. This safety bulletin aims to put together an introductory guide to abseiling, based on the learning experience from the trip. If you want to learn how to abseil safely and professionally, I personally recommend attending an ASM Abseiling course. What to do when abseiling:
- Always wear a helmet. When abseiling, look at where you plan to put your feet and make sure it’s not loose rock. If you happen to drop a rock (or anything), yell rock to the people below you (people below, don’t look up).
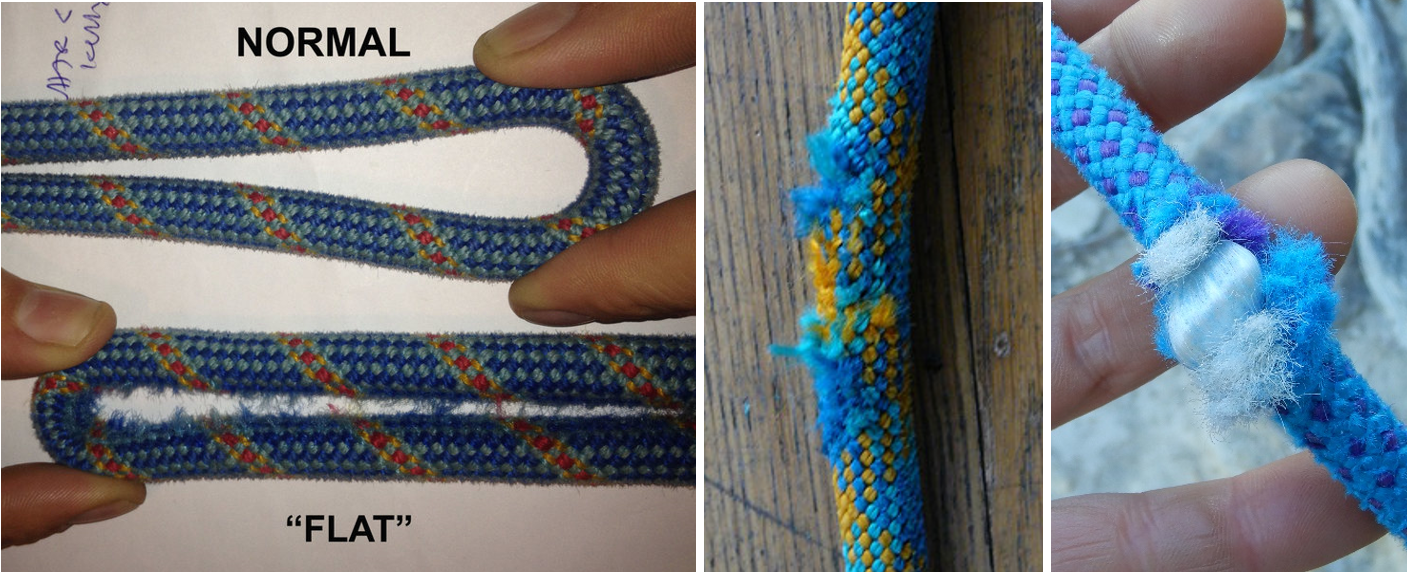
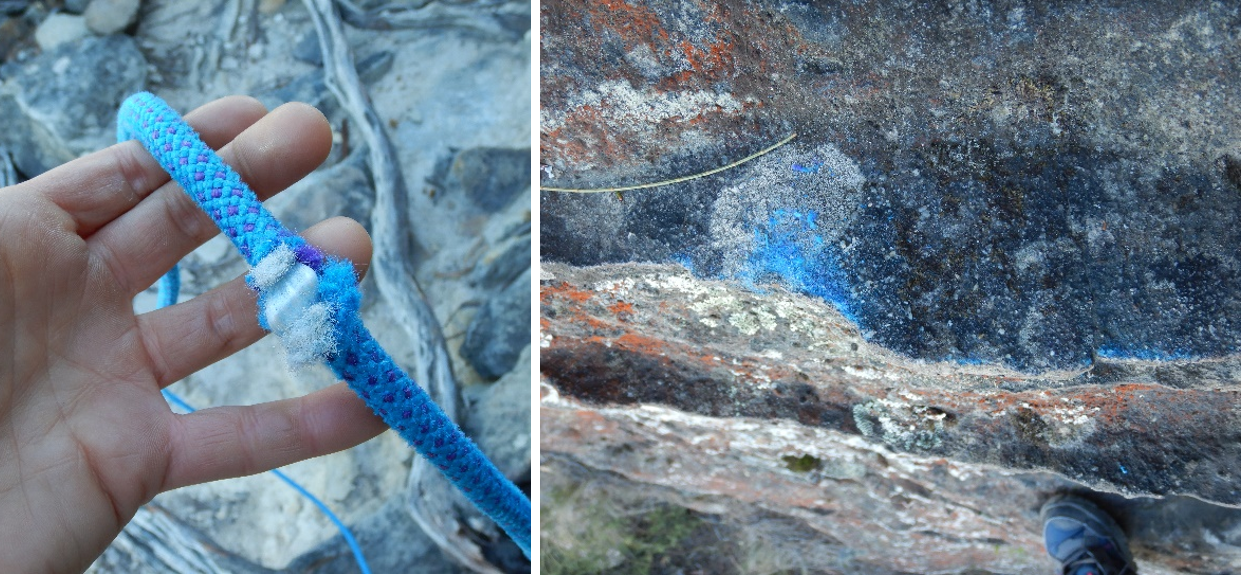
- Always check the ropes, from beginning to end. If there is any rope damage such as worn sheath (below middle), flat areas (below left) or visible core (below right), do not abseil. It’s highly recommended that you know how to abseil past a knot in case you need to isolate rope damage with an alpine butterfly.
- Always carry a spare rope. Make sure you know the length of the longest abseil and bring double that length, to be able to retrieve the rope after the last person abseils on double strands. Carry a spare rope when possible, for damage or rescue purposes.
- Abseil on static ropes. This is because static ropes don’t stretch and are stronger than dynamic ropes for the same rope diameter. Generally, the thicker the diameter, the stronger the rope. Dynamic ropes are for climbing (yes, they can be use for abseiling while climbing).
- Always examine the anchors. If you are using fixed bolts, check they are not rusted, lose or have sharp edges that could cut the rope. If you are using fixed chains, threat the rope through the last maillon, not through the upper/middle part of the chain. If you are using trees, they must be alive, well-rooted and bigger than “hug-size”. In all these cases and for any other anchor, evaluate it through the SRENE principle.
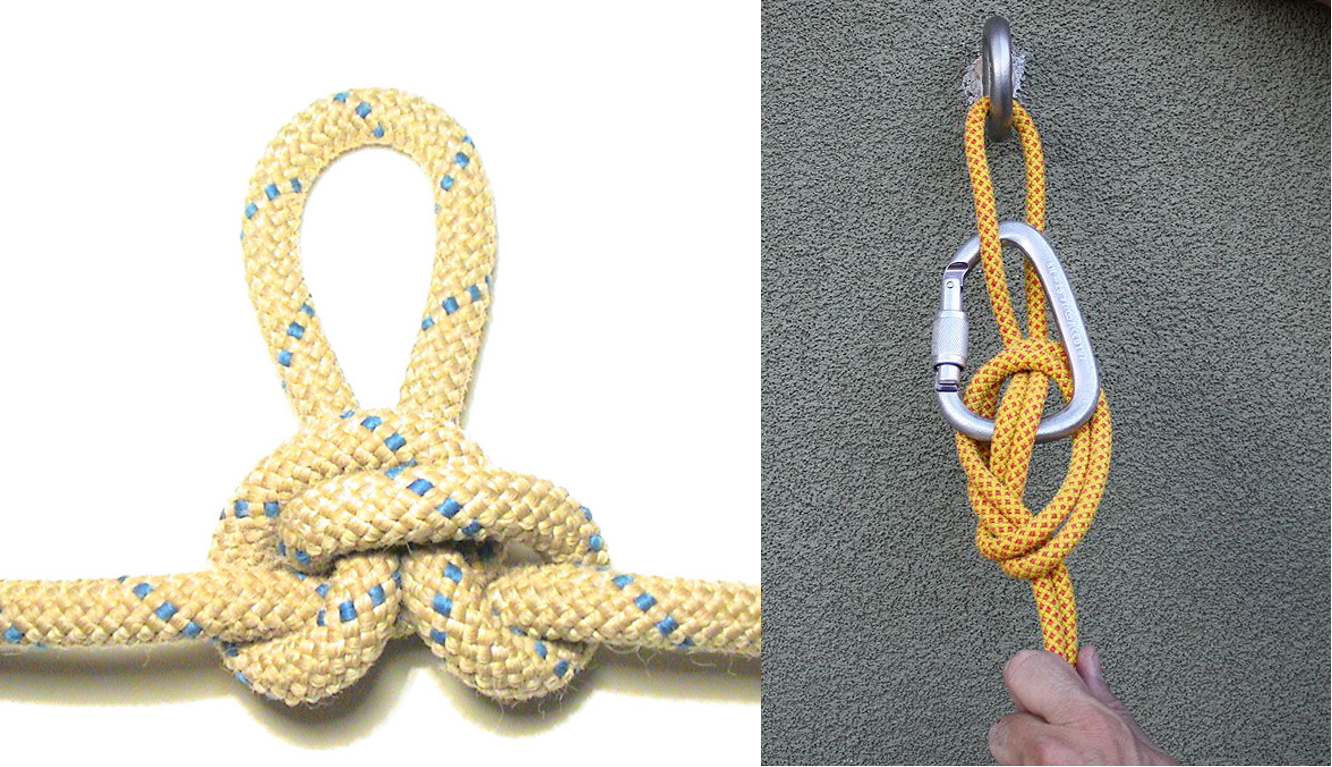
- Isolate the strands. Tie an alpine butterfly (below left) or stone knot (below right) (both on double strand) to isolate the 2 strands of the rope. This is important in case one strand gets damaged (if they are not isolated and one strand breaks, the whole system fails). Choose whether to abseil on double strand (recommended for redundancy) or single strand (recommended to perform rope rescue on the other strand if needed). Ideally, it’s safer to abseil on isolated double strand and have a spare rope for rope rescue if needed.
- (Almost) Always tie stopper knots at the end of the rope. Seriously, tie them. If the end of the rope doesn’t have any knot on it, you could abseil off it. The prusik and the belay device won’t stop when they reach the end of the rope unless there is a knot preventing them from sliding off. The only time when you could skip tying the stopper knots is when you’re canyoning down a waterfall with high water flow and getting off rope must be done ASAP, or when the end of the rope clearly touches the ground and there is rope to spare. Before retrieving the rope, do not forget to untie the knots (or it won’t slide through the anchors otherwise).
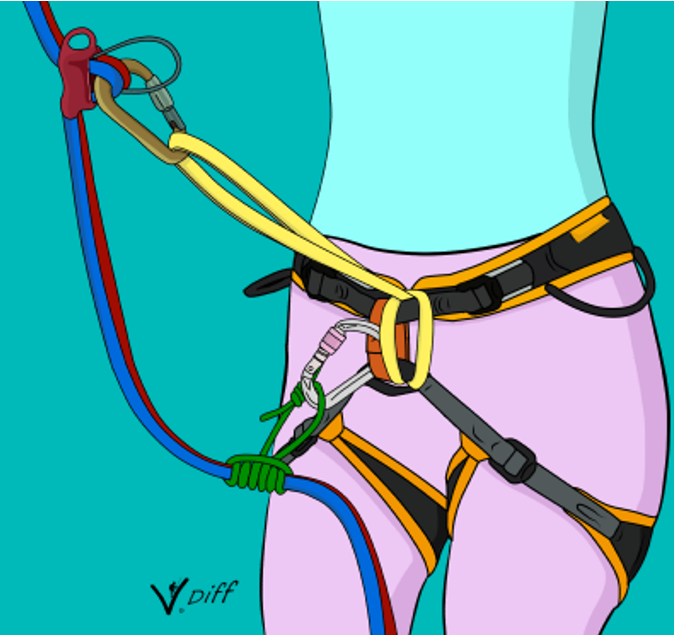
- Always clip your safety line to the anchors (and lock it!). Your safety line can be a dyneema or nylon sling, a PAS, a piece of dynamic rope (preferred), etc. 120 cm length will give you flexibility to move around the anchors. 60 cm is sometimes too short. Your safety line must be tied to the tie-in points of your harness, not to the belay loop. When you reach the anchors, clip your safety. Once you have put your belay device and prusik cord on the abseiling rope, test that they hold your weight properly before unclipping your safety. To unclip, keep one hand on the breaking side of the abseiling rope (e.g. on the prusik) and use the other hand to unclip.
- Always make sure you know how to use your belay device. With the club, you will generally use an ATC. In that case, remember to put the teeth of the ATC to the breaking side of the rope and the smooth area to the rope that goes up to the anchors (see below). Clip the carabiner to your belay loop and lock it, not to your tie-in points. Before unclipping your safety, squeeze all the carabiners to check they are locked.
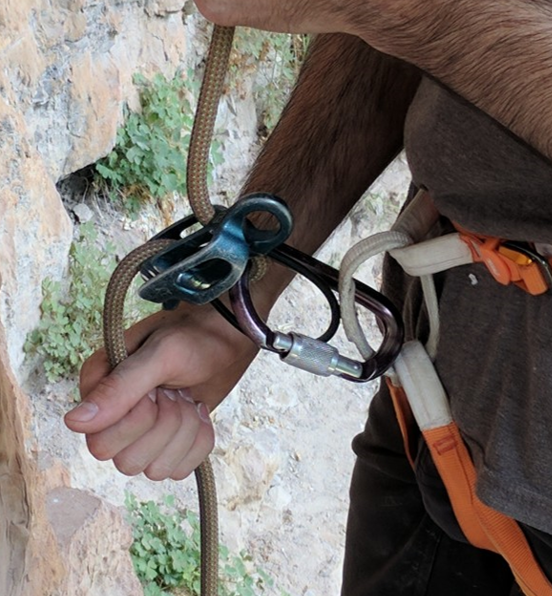
You can also use the ATC in fast mode (the teeth up and the smooth area down) to reduce the friction (only if there is too much friction).
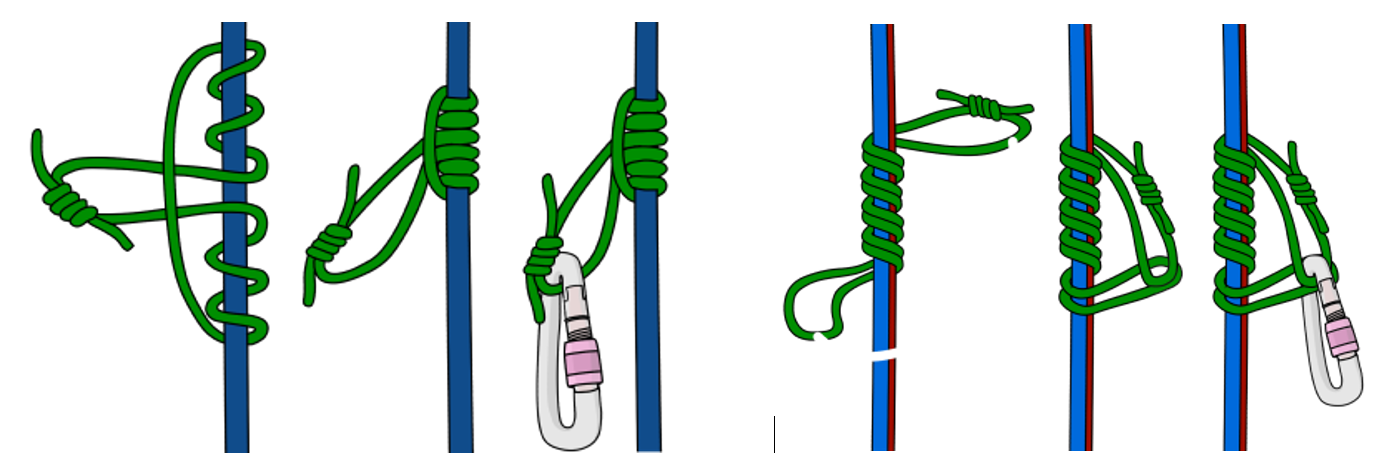
- Always carry a prusik cord (preferably 2). Before starting abseiling, you must know how to tie a classic prusik (left) or a French prusik (right, also called autoblock). A prusik cord is a back-up that works by friction: if you suddenly lose control over the belay device and fall, the acceleration will cause the prusik to engage and lock, holding your weight. Only a nicely tied prusik of an appropriate diameter will lock, so tie it right. You should carry 2 prusiks in case you need to ascent up the rope (prusik up the rope). It’s highly recommended that you know how to prusik up a rope before going abseiling.
- Always keep the belay device and the prusik away. If the distance between the belay device and the prusik is not long enough, the prusik may get jammed in the device and it won’t lock. This means you don’t have a functional back-up anymore, which is bad. To avoid this there are 3 options:
- Extend your belay device further up and tie your prusik to the belay loop (my preferred option).
- Keep your belay device on the belay loop and clip your prusik to the leg loop (beware the leg loop is not as strong as the belay loop).
- Keep your belay device on the belay loop and tie your prussik above the belay device, extending it to the clip the belay loop.
The option you decide to use will come with practice, personal preference and gear available.
- Use rope protectors and abseil with good technique. Good technique means you abseil at a steady speed (the belay device moves gently and steadily), with your legs at roughly right angles to the rock face, knees slight bended, feet half a meter apart. Descend gently by walking backwards using the friction of the rope through the belay device to control the speed. PLAN AND CONTROL the points where the rope will touch the rock. Look for smooth areas and use your body so the rope lies on those areas. Avoid sharp edges (see below). Once the rope is touching the rock, go straight down. No right, no left, no swinging, as this causes rubbing rope-rock. When the rope is weighted, it’s very easy to cut it, which is obviously very dangerous (see below). Rope protector significantly help reducing the wearing.
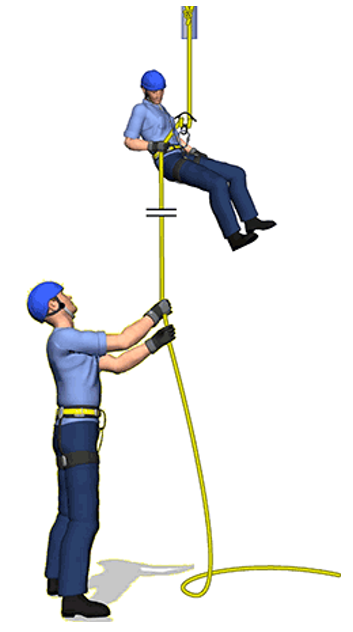
- Fireman’s belay when possible. The person at the bottom (the first and last person should always be the trip leaders) should offer a Fireman’s belay to all the abseilers (see below). Hold the strands with a bit of slack and be ready to pull down if the person loses control over the abseil. Making the rope tight will lock the belay device.
- Lastly, always call it out when you see any rope damage or unsafe practice. SEE SOMETHING, SAY SOMETHING. This is extremely important. In daily life, people don’t tend to speak up. In the outdoors, if you don’t speak up when needed, it may lead to a catastrophe. As a trip leader, always call out any rope damage, lose rock, lose anchor point, bad forecast incoming, unsafe behaviour close to cliff edges, etc. As a participant, DO NOT RELY entirely on the leader to speak up. Double check your gear and ask questions if unsure. If in doubt, call it out. Safety is number 1 priority. And happy abseiling! 😊
Cheers, Maria